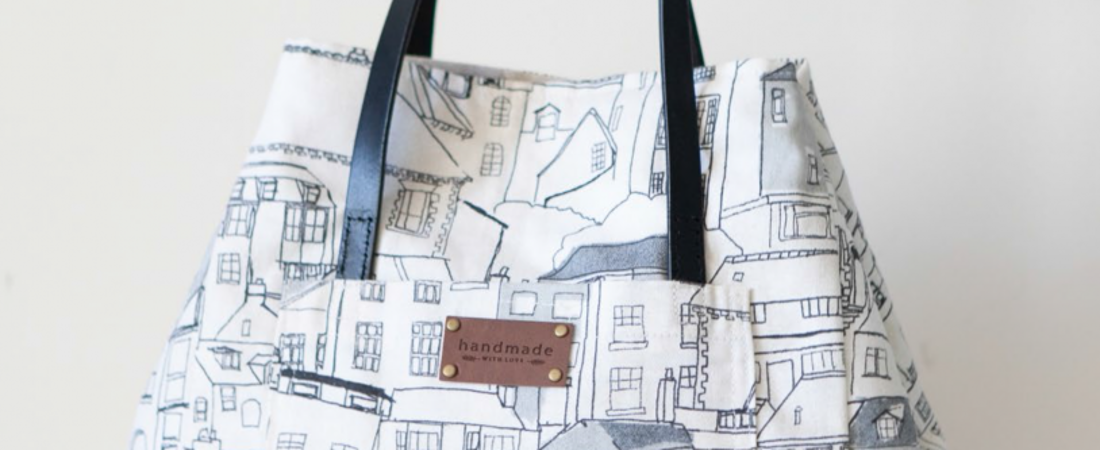
REGULAR SIZE: 11 1/2” WIDTH X 12 1/4” HEIGHT X 5” DEPTH (APPROX.) LARGE SIZE: 13 3/4” WIDTH X 14 3/4” HEIGHT X 5 3/4” DEPTH (APPROX.)
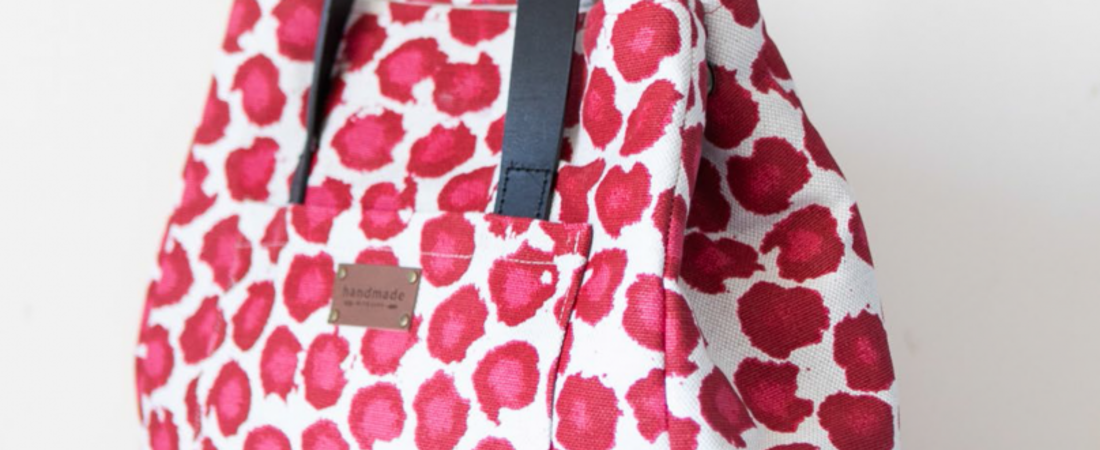
Mallory Tote Bag is a modern and versatile bag, perfect as your everyday companion! Due to its convenient proportion and size, this tote can be used for short trips to the market, books, tablets, and other essentials! This bag is a great project, a great personal addition to your collection, and a beautiful gift. The compact yet interior can easily carry all your everyday essentials and more! It can be made using various kinds of materials such as leather, suede, or any common cotton fabric. Make it as a gift or as a general, all-purpose bag for your own, the Mallory Tote Bag is the one- stop solution! Designer’s Review
MATERIAL LIST
FABRIC
44” wide medium weight home decorator, quilting weight cotton
- (1) Yard for exterior fabric
- (1) Yard for lining
44” wide leather of artificial leather (1/2) Yard for handles
INTERFACING
(1) Yard for of 44” wide light weight fusible interfacing
OTHER
(1) 18mm magnetic snap (1) 8” All-purpose zipper for lining zipper pocket (1) 3” Length, ¾” wide hook and loop fastener (2) Packs of line 20 or line 24 snap (1) Spool of coordinating thread ALTERNATIVE HANDLES (2) 26” X 5/6 (15mm)” leather handles for regular size bag (2) 26” X 1” (25mm) leather handles for large bag
TOOLS
Ruler, Scissors, Chalk pencil, Pencil, Sewing machine, Pins, Needle, Shape tool, Fabric clips, Snap button setter tool kit, Hammer
- All units are inches.
- Seam allowance 3/8” unless otherwise specified. ** After printing the pattern and taping the pieces together, please follow the reference the provided size guide (3" or 5"). ** Patterns marked as A4 are for users who utilize the A4 standard paper size.
© 2022 Copyright of ithinksew.com
The finished products may only be sold when the following conditions are applied.
*Full credit must be given to ithinksew.com for the patterns (both online and offline). For example, when products are sold online, they must include a statement saying “This pattern was designed by ithinksew.com.”
When sold offline, a tag must be attached, stating, “The finished products may only be made by crafters. It may not be mass produced.” The conditions above may change.
* All units are inches.
* Seam allowance 3/8” unless otherwise specified.
** After printing the pattern and taping the pieces together, please follow the reference the provided size guide (3" or 5").
** Patterns marked as A4 are for users who utilize the A4 standard paper size
INSTRUCTION
Cut out the Fabric
Draw the patterns directly onto the wrong side of
a single layer of fabric. Cut out the exterior,
lining, and interfacing. Fuse the interfacing on
the wrong side of the exterior, following the
manufacturer’s guide.
EXTERIOR
(2) Front and Back Pieces
(2) Side Pieces
(1) Bottom Piece
(1) Front Pocket Piece
INTERIOR
(2) Front and Back Pieces
(2) Side Pieces
(1) Bottom Piece
(2) Zipper Pocket Pieces
INTERFACING (no seam allowance needed)
(2) Front and Back Pieces
(2) Side Pieces
(1) Bottom Piece
Tip. There are two options in cutting the interfacing, with or
without the seam allowance. Cutting the interfacing without
any seam allowance will give it a better overall shape; if you
would like to do this, use the original pattern (gray dotted line)
to cut out the interfacing.
OTHER
(1) 3” Length, Hook and Loop Fastener
LEATHER HANDLES
(2) 26” X 2 ½” leather handles for regular bag
(2) 26” X 3” leather handles for large bag
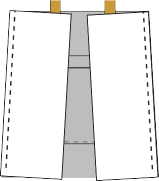
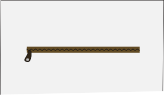
Make the Handles
When using the alternative leather handle strap,
skip steps 1 to 3.
1 Fold each side of the leather handle 1/2”
inwards.

2 Fold and press the strap in half lengthwise.
Topstitch the handle 1/8” from the folded edge.

3 Make the remaining handle in the same
manners.
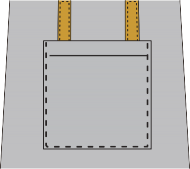
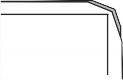
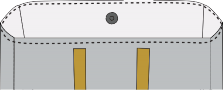
4 Place the both folded ends of the strap to the
exterior front as indicated on the pattern. Stitch
the strap 1/8” away from the edges, leaving
about 1 3/8" from the top edge of the bag.
Repeat this process for the back piece.

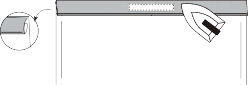
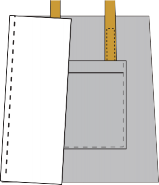
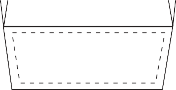
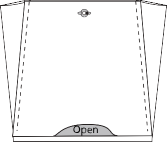
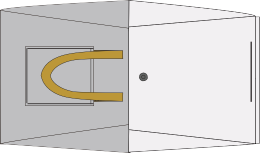
Make the Front Pocket
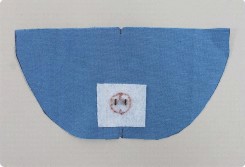
1 Separate the 3” hook and loop fastener for the front pocket. Place the hook and loop fastener onto the right side of the top of the front pocket as indicated on the pattern. Pin and stitch in a rectangular shape. Stitch the other side of the hook and loop fastener onto right side of the exterior front as indicated on the pattern.

2 Fold over the top seam of the exterior pocket 1" with wrong sides facing together and press. Fold over 1" again and press. Topstitch 1/8” away from the folded edge, backstitching on both ends. Fold and press a 1/2” the bottom and side seams of the exterior pocket with wrong sides facing together and press.
3 Place the exterior front pocket onto the exterior front piece as indicated on the pattern. Pin and stitch around but leave the top unstitched, backstitching at ends.
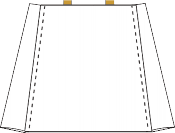
Make the Exterior Bag
1 Place the side piece onto the exterior front with right sides facing together, aligning the side seams. Pin and stitch the side of the exterior and side piece, leaving 3/8” bottom seams. Backstitch at the beginning and end.
2 Attach the other side piece in the same manner.
3 Attach the exterior back piece to the side piece in the same manner.
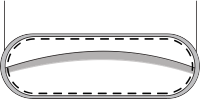
4 Place the exterior bottom piece onto the assembled front and back exterior pieces with right sides facing together, matching the four center points.
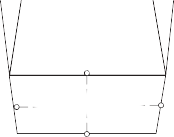
5 Stitch the pieces together.
6 Clip the corner seams. Turn the exterior bag right side out.
Make the Lining Bag
1 Make the zipper pocket onto the lining back piece, see Appendix A. Make the Zipper Pocket.
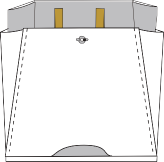
2 Assemble the magnetic snap to the lining front and back as indicated on the pattern.

3 Assemble the lining in the same manner as the exterior.
When stitching the bottom of the back, leave a 4” opening for turning the bag right side out.
Assemble the Bag
1 Press the exterior and lining seams open. Place the exterior bag into the lining bag with right sides facing together.
2 Pin and sew the top opening of the exterior and lining pieces. Backstitch on both ends. Trim the corner seams.
3 Turn the bag right side out through the opening. Stitch the opening closed.
4 Tuck the lining into the exterior. Press the top opening of the bag. Topstitch around the opening 1/8” from the edge.
5 Assemble the opposite side of the snaps to the side of the bag as indicated on the pattern. see Appendix O. Attach the Snaps.
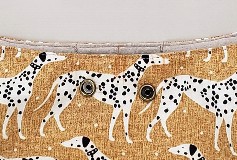
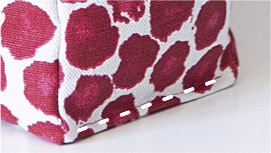
6 OPTIONAL PROCESS - To structure of the bag further, fold the both sewn edge of the side and bottom panel with wrong right side together. Topstitch the edge of the side bottom line together 1/8” away from the sewn edge, 1/2” away from the both side edge. Backstitch on both ends. Repeat this for the other side and bottom panel.
APPENDIX
Appendix A. Make the Zipper Pocket
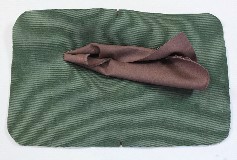
1 Draw the zipper line onto the wrong side of zipper pocket piece as indicated on the pattern. Place the zipper pocket piece onto the fabric with the right side facing together. Pin and stitch in a rectangular shape. Backstitch on starting and ending points.
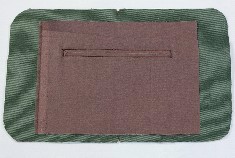
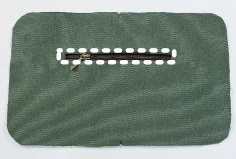
2 Cut out the inside as indicated on the zipper pocket pattern.
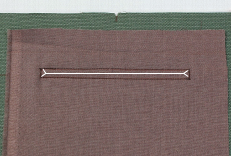
3 Insert the fabric toward the wrong side of lining.
4 Press the seam. The right side of fabric will look like the picture.
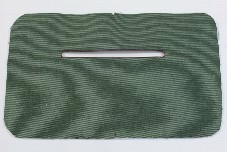
5 Match the zipper's right side with the fabric’s wrong side, pin in place and stitch in a rectangular shape.
6 Flip the fabric piece, so you can see the wrong side of the fabric. Place the other zipper pocket piece with right sides together. Stitch in a rectangular shape. Stitch only the two zipper pocket pieces.
Appendix P. Attach the Magnetic Snap
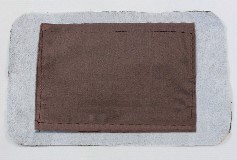
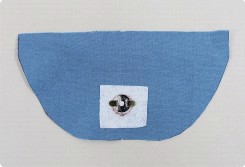
1 Cut a piece of interfacing approximately 2” X 2”. Center the interfacing over the marked magnetic snap position on the wrong side of the fabric. Place the snap as indicated on the pattern onto the interfacing. Use a pencil to draw a line where the fabric will be cut. Cut the line.
2 Insert the prongs of one of the magnetic snaps through the right side of the fabric. Place the metal support of the snap over the prongs. Secure the thin prongs on the wrong side of the flap.
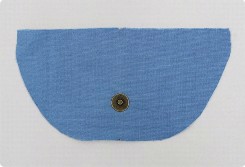
3 Finished picture.
Appendix O. Attach the Snaps
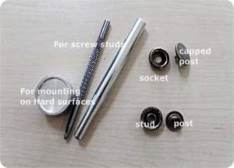
The caps (and posts) have a long prong that stick out, while the sockets and studs each have a center hole. The prong is poked through the fabric and then comes up through the hole of a socket or stud. The cap and the socket are one set, while the stud and post are one set. The instructions on how to attach the snaps are as follows.
1 Snap sets, snap setter.
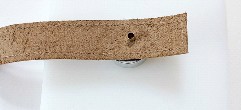
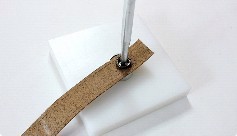
2 Place your capped post, post up, on your setting anvil.

3 Place the forward side leather piece wrong side facing up, so that the post pushes through the hole.
4 Put the socket over the cap.
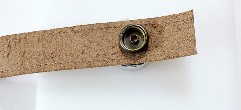
5 Put the punch on the socket and hit the punch using the hammer.
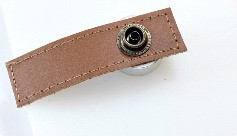
6 Repeat this process for the remaining stud and post to the backward side leather
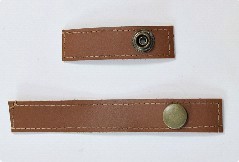
7 Assembled snaps.
johnqwerty.lee1 - Sunday, February 26, 2023
wow!
johnqwerty.lee1 - Sunday, February 26, 2023
This is a username
clbng28 - Thursday, February 9, 2023
<div class="row"><div class="col-md"><h2>New</h2><p><strong>Make the Exterior Bag</strong></p> <p><strong>1 </strong>Place the side piece onto the exterior front with right sides facing together, aligning the side seams. Pin and stitch the side of the exterior and side piece, leaving 3/8” bottom seams. Backstitch at the beginning and end.</p> <p><img src="https://spapi.ithinksew.com/uploads/b47cba60-08e1-43e4-a5ae-406f7d585be8/Image_012.png" /></p> <p> </p> <p><strong>2 </strong>Attach the other side piece in the same manner.</p> <p><img src="https://spapi.ithinksew.com/uploads/ae47ece6-83c9-4899-a563-640e14f67e33/Image_013.png" /></p> <p> </p> <p><strong>3 </strong>Attach the exterior back piece to the side piece in the same manner.</p> <p><img src="https://spapi.ithinksew.com/uploads/307631c7-693a-4512-86aa-c835343279ad/Image_014.png" /></p> <p><strong>4 </strong>Place the exterior bottom piece onto the assembled front and back exterior pieces with right sides facing together, matching the four center points.</p> <p><img src="https://spapi.ithinksew.com/uploads/e031dfcf-4b34-41df-a2e6-31e6fbfbc539/Image_015.png" /></p> <p> </p> <p><strong>5 </strong>Stitch the pieces together.</p> <p><img src="https://spapi.ithinksew.com/uploads/47e0b32f-4544-4603-8757-310f9b088924/Image_016.png" /></p> <p> </p> <p> </p> <p><strong>6 </strong>Clip the corner seams. Turn the exterior bag right side out.</p> <p><img src="https://spapi.ithinksew.com/uploads/590b7497-381e-40fd-8842-4f2c6f12b004/Image_017.png" /></p> <p> </p> <p>7 I LOVE TESTING</p> <p> </p> </div><div class="col-md"><h2>Original</h2><p><strong>Make the Exterior Bag</strong></p> <p><strong>1 </strong>Place the side piece onto the exterior front with right sides facing together, aligning the side seams. Pin and stitch the side of the exterior and side piece, leaving 3/8” bottom seams. Backstitch at the beginning and end.</p> <p><img src="https://spapi.ithinksew.com/uploads/b47cba60-08e1-43e4-a5ae-406f7d585be8/Image_012.png" /></p> <p> </p> <p><strong>2 </strong>Attach the other side piece in the same manner.</p> <p><img src="https://spapi.ithinksew.com/uploads/ae47ece6-83c9-4899-a563-640e14f67e33/Image_013.png" /></p> <p> </p> <p><strong>3 </strong>Attach the exterior back piece to the side piece in the same manner.</p> <p><img src="https://spapi.ithinksew.com/uploads/307631c7-693a-4512-86aa-c835343279ad/Image_014.png" /></p> <p><strong>4 </strong>Place the exterior bottom piece onto the assembled front and back exterior pieces with right sides facing together, matching the four center points.</p> <p><img src="https://spapi.ithinksew.com/uploads/e031dfcf-4b34-41df-a2e6-31e6fbfbc539/Image_015.png" /></p> <p> </p> <p><strong>5 </strong>Stitch the pieces together.</p> <p><img src="https://spapi.ithinksew.com/uploads/47e0b32f-4544-4603-8757-310f9b088924/Image_016.png" /></p> <p> </p> <p> </p> <p><strong>6 </strong>Clip the corner seams. Turn the exterior bag right side out.</p> <p><img src="https://spapi.ithinksew.com/uploads/590b7497-381e-40fd-8842-4f2c6f12b004/Image_017.png" /></p> <p> </p> </div></div>
clbng28 - Wednesday, February 8, 2023
<div class="row"><div class="col-md"><h2>New</h2><p>© 2022 Copyright of ithinksew.com</p> <p>The finished products may only be sold when the following conditions are applied.</p> <p>*Full credit must be given to ithinksew.com for the patterns (both online and offline). For example, when products are sold online, they must include a statement saying “This pattern was designed by ithinksew.com.”</p> <p>When sold offline, a tag must be attached, stating, “The finished products may only be made by crafters. It may not be mass produced.” The conditions above may change.</p> </div><div class="col-md"><h2>Original</h2><p>Sampe text</p> </div></div>
clbng28 - Wednesday, February 8, 2023
Lorem ipsum dolor sit amet, consectetur adipiscing elit, sed do eiusmod tempor incididunt ut labore et dolore magna aliqua. Ut enim ad minim veniam
clbng28 - Wednesday, February 8, 2023
Lorem ipsum dolor sit amet, consectetur adipiscing elit, sed do eiusmod tempor incididunt ut labore et dolore magna aliqua. Ut enim ad minim veniam
clbng28 - Wednesday, February 8, 2023
<p>Lorem ipsum dolor sit amet, consectetur adipiscing elit, sed do eiusmod tempor incididunt ut labore et dolore magna aliqua. Ut enim ad minim veniam</p>
clbng28 - Wednesday, February 8, 2023
<p>Lorem ipsum dolor sit amet, consectetur adipiscing elit, sed do eiusmod tempor incididunt ut labore et dolore magna aliqua. Ut enim ad minim veniam</p>
clbng28 - Wednesday, February 8, 2023
<p>Lorem ipsum dolor sit amet, consectetur adipiscing elit, sed do eiusmod tempor incididunt ut labore et dolore magna aliqua. Ut enim ad minim veniam</p>
johnqwerty.lee1 - Tuesday, January 24, 2023
<p>wow!</p>
johnqwerty.lee1 - Tuesday, January 24, 2023
wow!
johnbie - Friday, January 13, 2023
<div class="row"><div class="col-md"><h2>New</h2><p><strong>Wow!<br /> FABRIC</strong></p> <p>44” wide medium weight home decorator, quilting weight cotton</p> <ul> <li>(1) Yard for exterior fabric</li> <li>(1) Yard for lining</li> </ul> <p>44” wide leather of artificial leather (1/2) Yard for handles</p> <p><strong>INTERFACING</strong></p> <p>(1) Yard for of 44” wide light weight fusible interfacing</p> <p><strong>OTHER</strong></p> <p>(1) 18mm magnetic snap (1) 8” All-purpose zipper for lining zipper pocket (1) 3” Length, ¾” wide hook and loop fastener (2) Packs of line 20 or line 24 snap (1) Spool of coordinating thread ALTERNATIVE HANDLES (2) 26” X 5/6 (15mm)” leather handles for regular size bag (2) 26” X 1” (25mm) leather handles for large bag</p> </div><div class="col-md"><h2>Original</h2><p><strong>FABRIC</strong></p> <p>44” wide medium weight home decorator, quilting weight cotton</p> <ul> <li>(1) Yard for exterior fabric</li> <li>(1) Yard for lining</li> </ul> <p>44” wide leather of artificial leather (1/2) Yard for handles</p> <p><strong>INTERFACING</strong></p> <p>(1) Yard for of 44” wide light weight fusible interfacing</p> <p><strong>OTHER</strong></p> <p>(1) 18mm magnetic snap (1) 8” All-purpose zipper for lining zipper pocket (1) 3” Length, ¾” wide hook and loop fastener (2) Packs of line 20 or line 24 snap (1) Spool of coordinating thread ALTERNATIVE HANDLES (2) 26” X 5/6 (15mm)” leather handles for regular size bag (2) 26” X 1” (25mm) leather handles for large bag</p> </div></div>
johnbie - Friday, January 13, 2023
<div class="row"><div class="col-md"><h2>New</h2><p>Hello!</p> <p><strong>FABRIC</strong></p> <p>44” wide medium weight home decorator, quilting weight cotton</p> <ul> <li>(1) Yard for exterior fabric</li> <li>(1) Yard for lining</li> </ul> <p>44” wide leather of artificial leather (1/2) Yard for handles</p> <p><strong>INTERFACING</strong></p> <p>(1) Yard for of 44” wide light weight fusible interfacing</p> <p><strong>OTHER</strong></p> <p>(1) 18mm magnetic snap (1) 8” All-purpose zipper for lining zipper pocket (1) 3” Length, ¾” wide hook and loop fastener (2) Packs of line 20 or line 24 snap (1) Spool of coordinating thread ALTERNATIVE HANDLES (2) 26” X 5/6 (15mm)” leather handles for regular size bag (2) 26” X 1” (25mm) leather handles for large bag</p> </div><div class="col-md"><h2>Original</h2><p><strong>FABRIC</strong></p> <p>44” wide medium weight home decorator, quilting weight cotton</p> <ul> <li>(1) Yard for exterior fabric</li> <li>(1) Yard for lining</li> </ul> <p>44” wide leather of artificial leather (1/2) Yard for handles</p> <p><strong>INTERFACING</strong></p> <p>(1) Yard for of 44” wide light weight fusible interfacing</p> <p><strong>OTHER</strong></p> <p>(1) 18mm magnetic snap (1) 8” All-purpose zipper for lining zipper pocket (1) 3” Length, ¾” wide hook and loop fastener (2) Packs of line 20 or line 24 snap (1) Spool of coordinating thread ALTERNATIVE HANDLES (2) 26” X 5/6 (15mm)” leather handles for regular size bag (2) 26” X 1” (25mm) leather handles for large bag</p> </div></div>